Making an item for IMVU in Blender:
Most of the tutorials out there start with a basic box shape. Not me. There are WAY too many basic box shaped items in
the catalog. If you were going to make one of those, just go retexture it and don't waste the time making it in Blender.
I want to walk you through making an item that you can actually customize and submit, so this will be a more generalized
tutorial that most.
What you need to get started:
An Idea....sounds easy enough, but not always. I'm going to walk through the steps of making a potted plant, just because
there are so many things you can customize with it.
You will also need the avatar scale example that Neo made. I use it all the time. You can get it HERE. It is the first download on the list.
In Blender, when you first open it, you get a cube, a camera, and a light. Select them all and delete them. The camera
and light are useless in IMVU and the cube, well I just like to start with a clean slate.
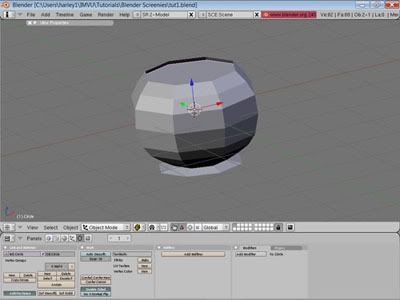
Next, add a UV Sphere. Go into top view. Hit spacebar, the select Add>Mesh>UV Sphere
For the example, I'll use 8 segments and 12 rings. Go back into front view.

]
Now deselect everything and then select the top most vertex only. Hit x>Erase>vertices to make the top open.
With the box selection tool, select the last ring but not the bottom vertex.
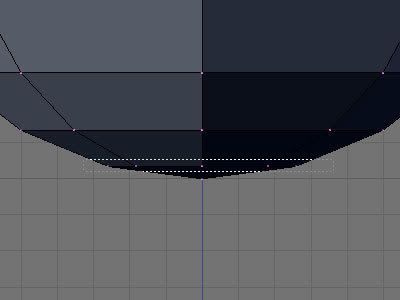
Drag them down so that they are even with the bottom vertex. This will be the bottom of the planter. Then scale it to
whatever size you want. Deselect everything.
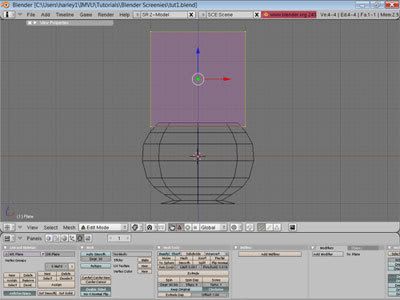
Now, select the next ring up. Move and scale it until starts to make the very bottom of the shape of your planter.
Continue doing this with each ring in order to create the shape you want you planter to be. This is where you can get
really creative. If you get to a point where you like your shape but still have extra rings, just select then and delete then
just like you did the top vertex.
Make sure you save you work often. I'm sure we all know that, but it help to have a reminder now and again. Trust me,
I remembered the hard way.
Now we get dirty....kinda. We are going to add the dirt to our plant.
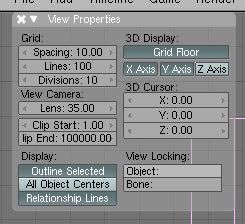
Go back into object mode. Make sure your cursor is exactly at the origin. To do this the accurate way, go to View>View
Properties. In the pop up menu, change the 3D cursor to all 0's.

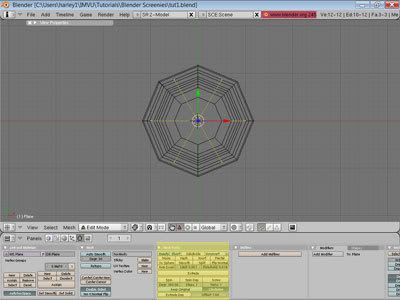
In top view, hit spacebar Add>Mesh>circle. Make the number of vertices the same as the number of sections of your pot,
for me it was 8. Also make sure fill is clicked in the circle menu.
Go into front view and move your circle up to where you want the level of the dirt. Scale your circle up so that it just
fits inside of your pot. Go back into object mode and look at you object so far. Look at it from all angles to make sure
that you don't have something at a weird angle or a stray vertex off in limbo.
Lets make something grow. Add the plant.
Basically, you plant will be made up of several planes that all intersect at the center, kinda like a stand up card. Eash
plane will have the same picture. Then you will add an opacity map to get rid of the parts of the plane that are not part
of the plant itself. Here is how:
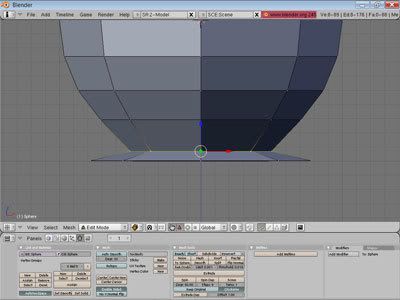
Go back into object mode and front view if you aren't already. Add>Mesh>Plane. Scale it so that it is a bit bigger than
you want your plant to be in all directions. Then drag it up so that the bottom edge is just touching or even just barely
below the dirt you just made. You can see it better in wireframe mode.
Now, go into top view. Make sure that the all the vertices of the plane are selected. Now you need to decide how many
planes you want to make for your plant, I'm going to use 3.
There are many ways to make those planes, but this way is a more universal approach. In the bottom pane, there is a box
called Mesh Tools (highlighted below). In the middle of that is are the settings you want to change. Set it to 360 degrees
and the number of steps to the number of planes you want, 3 for me. Then hit Spin Dup and it will make all of your planes.
You have to also hit Rem Doubl to get rid of the extra one that it created. I think that is easier that doing all the math.
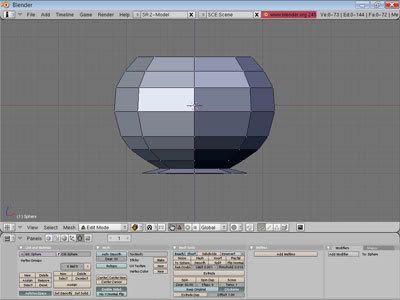
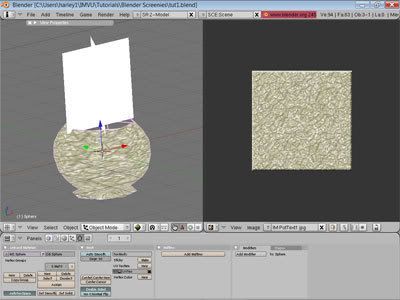
Go into Object mode. Check out your work and get you textures ready fro the next step...UV mapping in Blender.
Make sure your work is saved....just in case.
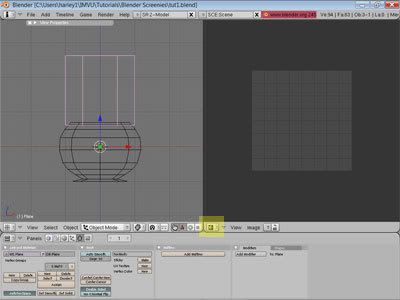
Go into object mode. Click on the very edge of the edit screen. You should get a menu that says Split Areas. Click on it
then click where in the middle of the screens. Then in the Window Type menu (highlighted) go to UV/Image Editor. You screen
should look sort of like this.
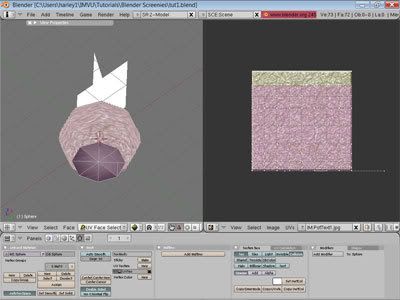
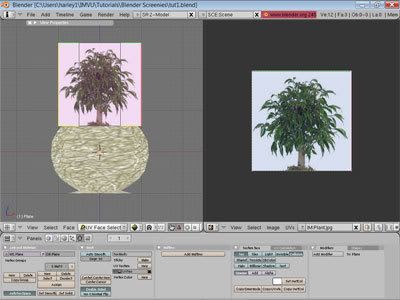
In object mode, select the pot and only the pot. Now in the object window on the left, select UV Face Select from the
mode menu. Hit A-Key to select all the faces. Then in the image window on the right, select Image>Open then find the image
file you want to use.
**NOTE** There are a ton of different ways to UV map you objects. The following is just one way. I'll try and make a
separate tutorial on that after this one.
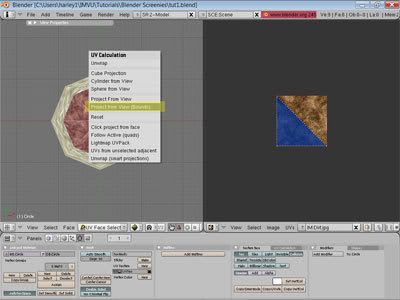
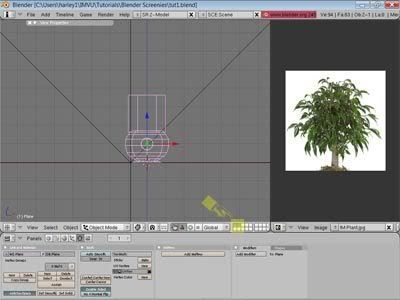
Go into textured view mode. This will show you what you object looks like as you are mapping it. Look around and make
sure that all the faces mapped, even though they will likely be wrong. Make sure you are in front view and that the 3D cursor
is exactly centered again. Hit U-Key then click on cylinder from view. Now it is mapped like it was shrink-wrapped with
a cylinder that had you texture on it. Now look at it from different angles. Notice the bottom?
Now deselect everything, then select only the bottom faces. Then go into Top view and hit U-Key and click on project from
face. Leave only the bottom faces selected. In the image window, select everything and scale it down and move it around
to where ever you like. If it is overlapping where the other faces are already mapped that is ok.
Go back into object mode and look around at your object. It may not be exactly how you want it, but this gives you a basic
idea of it. I'll go into more detail in the UV Mapping tutorial on how to tweak it and different options. Now you have mapped
the pot for your plant.
Next more dirty work.
When you were looking at it, did you notice that in textured view, your dirt is gone? (if it is not gone, don't do the
next part and just skip to right after the next screenie) Its not, the normal is pointing the wrong way. The normal just
tells Blender and IMVU which way is the surface facing. Its easy to fix.
Go into wire frame view mode in object mode and select the circle for the dirt. Hit tab to go into edit mode. Select
all the vertices. Now go to Mesh>Normals>Flip . Go back into object mode and textured view mode. It should be there and
white now.
Go into UV face select again and select all of the faces of the circle. Open up your image in the right hand window. Hit
U and unwrap just like before. Make sure that they all unwrapped to something again. Now with all the faces still selected,
go into top view and hit U>project from view(bounds).
Dirt done...that was easy huh?
Take a look at your work again and see how it looks. **NOTE** If you do not like the way a particular texture looks, you
can change it after you have it all in the previewer.
On to the Plant
Go back into UV Face Select and select all of your planes for you plant. Open your image. Unwrap them and make sure that
they all mapped to something just like before. Now select one plane. Make sure you are in front view. Unwrap it and use
project from view (bounds) again. It might be sideways or upside down. If so go over to the image window and select all
the vertices and hit R-key then hold down the CTRL key (to make it rotate in multiples of 5) and rotate it until it is right
way up.
Now in the left hand window, use the 4, and 6 on the number pad on the right of the keyboard to rotate the view until the
next plane is flat, or close to it, in your view. Select it and UV map it the same way as the first one. Repeat this process
until you have mapped all the planes for the plant.
Go back over into object mode and look around at your potted plant. The rest of fixing the textures, like adding an opacity
map to correct the plant and making you textures two-sided, gets done in the previewer.

Exporting it to the previewer.
Make sure that you have downloaded and installed the exporter from HERE or that you have a working method for using the included Cal3D exporter that comes with Blender. I use the other one because
I could not get the included one to work easily. Also, I will be using Neo's scaling node example from >>HERE<<. Its the first download on that page.
OK. Make sure you are in object mode and go to wireframe view. Select all and hit CTRL-J to join all meshes into one object.
In front view, move the entire thing up until the very bottom is just barely sitting above the red line. Zoom in a ways to
make it more accurate. If it is sitting below the red line, your bottom will be in the floor. Too high and it will look
like it is hovering in the air.
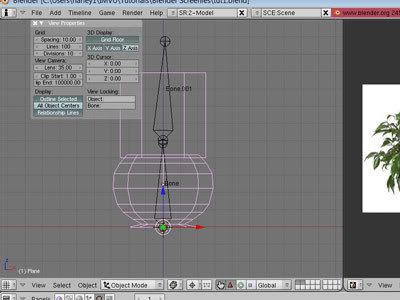
Now go to File>Append or Link and find the node file. When you click on it, you will get a menu. Click on Object and you
should get a choice of Armature. **NOTE** This is NOT the same as hitting Armature on the previous menu. Click on it and then
click on load. It will look like nothing happened. It loaded on layer 2. Hold shift and click the highlighted box to view
both layers. This is what it should look like.
It may only look like it added a few lines, but it didn't. Make sure that only the mesh is selected and zoom out. WAY
out. You should now see that there are actually two bones that were added. They are the correct scale of an avatar in IMVU.
Now just scale you object up until it is the size you want it in relation to an avatar in IMVU. You will probably get some
strange clipping in Blender also. Just set you view properties like I have them here and you should see everything just fine.
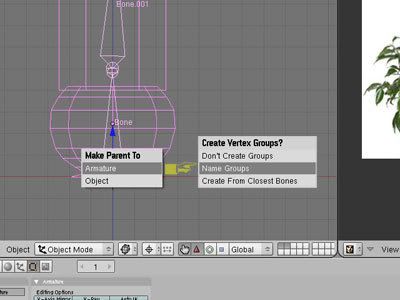
Now click on the Object and then the Armature so that the bone is highlight in a brighter pink. Then hit CTRL-P and click
on Armature and then on Create name groups.
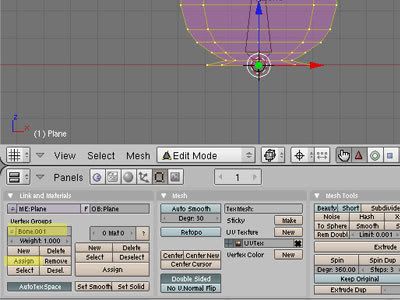
Click on the mesh so that it is the only thing selected. Now go into edit mode. Select ALL the vertices, that is a VERY
important step. If even one vertex is not selected, it will not export correctly. At the bottom, under links and materials,
make sure that Bone.001 is selected and hit Assign.
Go back into object mode and in from view. Select the object then the bone so that the bone is in a lighter pink, just
like above. In your other panel, open the scripts window. It the same menu that gave you the UV Image window (looks like
a little snake). click on scripts and Blender to IMVU 1.1. The only settings you will need to change are the directory to
save your files in and you can unclick the "_AF" box since that is only for animation. Then just click export and it should
say "Status: Export Finished" at the bottom. Then click on the other Blender window with all the code in it that sits in
the background. As long as there is not anything that says "Vertex.....has no influence....division by Zero...you bettre
find the offending vertex!" or something like that after the last time it says "DONE" then you are ready to export it into
the previewer. If it DOES say that, you need to go back and select just the mesh, go back into edit mode, select ALL the
vertices and hit assign again, because you missed one (or more). Then just follow through the rest of the instructions again.
All the files you just created now load into the previewer just like any other mesh would and you will have to add an opacity
map for the tree. Also **NOTE** for some unknown reason, Blender and the exporter flip any texture that is UV mapped. Before
you load your textures into the previewer, you'll have to go and flip them vertically in whatever program you are using.
Happy Creating and feel free to ask me any questions you might have. I'll be making more tutorials for Blender, but I'm
very busy at the moment so it might take some time.