ONE OF THE MOST REQUESTED HELP QUESTIONS ARE ON OPACITY MAPS
We can post and post directions on how to achieve this but it really needs a visual for you to
see the effect. So here ya go.
I am going to walk you through how I create one and what is used in the previewer. Hope this
takes away your nightmares of Opacity.
FIRST FIND AN OUTFIT TO DERIVE FROM
Most Mesh Creators will include the body sleeve collar shoes belt etc. TEMPLATES.
THESE ARE NOT THE OPACITY TEMPLATES. You as a Developer have to create them.
YOU WILL NOT FIND MANY DEVELOPERS THAT HAVE DERIVES WITH OPACITY MAPS IN ANY
PATTERN. ONLY COLORS. USUALLY WHITE OR A SHADE OF GRAY ARE USED.
THE SECRET TO CLOTHING IS OPACITY.
I am going to use the Raquel body style to create these templates for you as my EXAMPLE.
[center] [/center]
IF YOU ARE FAMILIAR WITH SEWING THIS TUT WILL CREATE YOUR PATTERN.
ONCE YOU HAVE CREATED THE PATTERN YOU WILL THEN WANT TO ADD THE MATERIAL OR
YOUR "TEXTURE".
I WILL BE ADDING TEMPLATES OF ALL KINDS TO GIVE YOU A VISUAL OF WHAT THE
PATTERN WILL DO. THE ONE I HAVE CREATED HERE IS IN NO WAY TO GIVE YOU AN
OUTFIT. IT IS TO SHOW YOU HOW THE PATTERN WORKS AND WHAT WILL SHOW IN THE
PREVIEWER.
You may copy all these images to your computer to see them in the previewer.
The first is a full color on the left side of the Avi {white} and the right is the opacity example.
for this white is used.
[center] [/center]
The second one is the fully transparent left side of the Avi {black} and the right is the opacity
example.
[center] [/center]
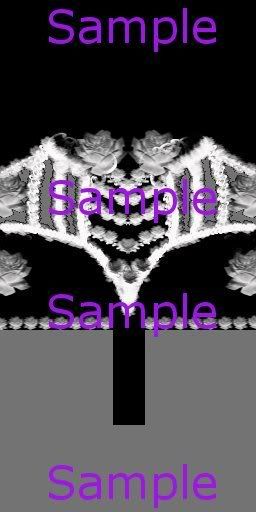
The third fourth and fifth are all shades of transparencies on the left side of the Avi {gray} and
the opacities on the right. I HAVE GIVEN YOU 3 EXAMPLES OF GRAY. Make sure you have the use blending ticked.
[center]
 [/center]
The next is a pattern not matched in the center for you to see where to line or to see where
you have created a mirror image of your pattern. middle split
[center] [/center]
The next is the exact pattern with it lined up to see a smooth pattern and the areas will either
be fully transparent or a solid color.
[center] [/center]
And finally 3 texture Patterns again please make sure to tick the blending tab to see
the pattern if you are using one of the gray opacity maps..
[center]

 [/center]
[center]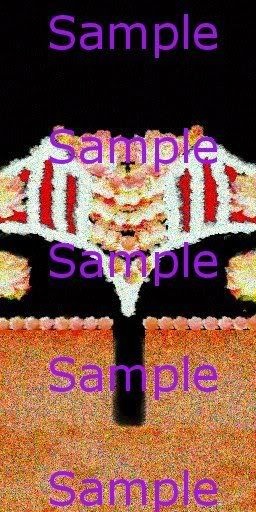
 [/center]
I USE GIMP
It will be much easier for you to follow this TUT if you are also using this program. It is free
and a great Manipulation Program for developing.
link is available in the {Tutorial} GIMP Post
START BY RIGHT CLICKING ON YOU BODY TEMPLATE AND SELECT EDIT WITH
GIMP
You should now have the image window open.
As you can see it is a map of the Avi body.
All of these lines do have a purpose and if you follow the guidelines you can create an
awesome opacity template.
[center] [/center]
The first thing you want to is to set the background color of the image as
TRANSPARENT.
Go to the the LAYERS TABand select TRANSPARENT
another drop down will appear in this box selectCHECKER BOARD PATTERN NEXT
TO ADD ALPHA.
[center] [/center]
Now go back to your LAYERS TAB AND SELECT
ADD NEW LAYER.
[center] [/center]
A SIZE WINDOW WILL POP OPEN AND THE DEFAULT
HERE IS THE EXACT SIZE AS YOUR MAP DO NOT CHANGE THIS SELECT
OK.
[center] [/center]
Note::: YOU CAN NOT SEE THE LAYER BECAUSE IT IS TRANSPARENT.
NOW FIND THE CENTER LINE ON YOUR BODY TEMPLATE.
Select yourRECTANGLE TOOL and cut the layer in half using the center line
of the torso / body as your guide.
[center] [/center]
Go to LAYERS TAB and select. CROP TO SELECTION.
This will give you HALF OF THE OPACITY TEMPLATE and will be explained
more in a moment.
Here is where you get creative and paint on you pattern.
FIND A BRUSH IN THE MENU TO BEGIN PAINTING ON YOUR PATTERN.
GIMP TUT POST HAS LINKS TO SITES WITH MORE BRUSHES. USE THEM.
IT CREATES ALL SORTS OF PATTERNS WITH A PUSH OF A BUTTON / YOUR PAINT BRUSH.
link is available in the {Tutorial} GIMP Post
Once you have created your pattern you want to Duplicate it. Go to LAYERS TAB and select
DUPLICATE LAYER
Next you will go to your TOOLS MENU select the FLIP
tool this will do exactly that.
Go to your TOOLS MENU AND select the MOVE TOOL
Now drag your layer to the LEFT SIDE OF MAP or empty side of your map.
Once you have your opacity artwork in place {Make sure the pattern matches exact} you will
want to ADD ANOTHER LAYER
Go to your TOOLS MENUand find the FILL BUCKET
Choose black as your fill color #000000. OR A SHADE OF GRAY.
This layer is now solid Black.
Now check on your DIALOGS TAB go to LAYERS.
Click so your Black layer is Highlighted,
Go to the arrows at the bottom of this WINDOW,
Click the ARROW DOWN TAB and move the Black Layer under both
White Opacity Layers.
Now see the Body Template Layer or Back Ground layer there is an eye there click it
and both the eye and the layer will disappear.
Or you can select this layer and click the trash can also at the bottom of
this window.I do not do this because you can turn the layers off and fix any pattern problems that
might arise later on if you save the image as a gimp file / .xcf.
This will save the template as a work in progress.
NOTE::: You will also have to save the image as a .jpg to pull it up in the
previewer.
Start looking in clothing catalogs etc I copy these images to use as guides to create more up to
date clothing good luck to all.
Here are some key points on using the previewer with opacity.
First and most important is your opacity pattern {BLACK WHITE AND GRAY} and your
TEXTURE / MATERIAL pattern {COLOR} have to be the EXACT same size in order to
work properly.
Most clothing meshes use 256 x 512, 256 x 256, 512 x 512.
Standard is 256 x 512.
1 size off and your Avi will be fully covered or worse naked.
Next is your blending
{blending is used in most Avi textures and lighting and glass and etc and etc}
If you look through a window or stand under lighting on a dance floor and your Avi is bald this
it because opacity maps or textures are used along with blending to achieve the look.
In the previewer you will see this tab make sure it is checked if you have any shade of gray.
You DO NOT have to use blend on solid black, solid white, or a combination of black
and white.
Note::: Make sure that your clothing complies with the Minimum Coverage Guidelines for
GA if you wish it to be rated GA. It will not pass Peer Review Or it will be tagged and will be
categorized as AP and Locked.
Here is an example pic of the previewer of blending tab in Previewer and the .xrf files in Previewer and 2 textures Material/Texture Opacity Pattern/Map to
choose the templates in Previewer.
[center] [/center]
and type the rest of the tut.
link to this box
http://imvu.com/groups/group/Developing%2BHelp%2BFor%2BN00b%2527s/read.php?209209,4612889,10657144#msg-10657144
Added to site 7/24/2008