|
This Tutorial Borrwed with Permission:
Quote:
"Lollirot">> Wet Look/PVC/Latex:
Basics in making Vinyl like Material.
Probably the most asked of me, is how I make my PVC / Wet Look materials.
Now while a lot of it is based off my ability far beyond what I will be showing here - there is some basics to it, that can
help you on your way to being better at it.
So lets start small. Open a 128x128px Canvas for this practice run before
applying it to real Texture Maps. Choose a just off black color to fill the Canvas. You may also even Inner Shadow in pure
Black around the edges.
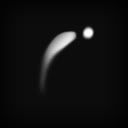
Now create a new Layer. [Layer > New > Layer] Select a small solid brush, set
to White. Apply a shape for shine. This is really up to you, the shape. Since PVC shimmer often is distorted, you can be messy.
Just in the future try to follow the shape of the body. [Such as curving circularly over breast, not straight.]
[Optional: You may then use your Smudge Tool on the sharper ends of the shine, to fade them out by shaking
your mouse back and forth a bit. Up and down, will do the trick.]
Now Duplicate your White layer. [Layer > Duplicate Layer > OK] Drag the Copy Layer, under the original.
Now, we are going to really blur this one. [Filter > Blur > Gaussian Blur] I suggest about 20px, or more. We want it
to be very easy to see, but still very blended.
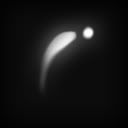
Duplicate the original layer yet again, and also drag this one under the original - but above our first copy. Now,
blur again. This time around 3px to 5px.
That is it. Now I made my shine very large for you to see what was going
on. When you do this on an actual texture - you usually will use thin, long shapes from your white brush.
You may
also take your Eraser Tool - and load Grundgy brushes, and remove with similar textures to your outfit. Then bring down the
opacity of your shine.

You will tend to do one side, and then just duplicate it to the other half of your map after you have done it. You
can always take the extra time to make the shine on either side different - which will seem more realistic.
|